

Showing posts with label caramel. Show all posts
Showing posts with label caramel. Show all posts
Thursday, January 19, 2012
Pumpkin Angel Food Cake with Salted Caramel Glaze
This is an absolutely divine dessert. And angel food is really so easy to make and the salted caramel glaze makes this seem really fancy, but I promise it's really easy!

Saturday, January 7, 2012
Mini Caramel Apple Cupcakes with Cream Cheese Filling
Been very quiet around here lately. That's my fault, shame on me! Some time in November I stopped everything else and spent every free minute crocheting Christmas gifts. I don't know what good it did me, since I wound up getting gift cards for most people anyway. :o( Next year I start in September.
So enough of the quiet, I need to catch up. I made these caramel apple cupcakes for my crochet group before the holidays. They were really good, but a lot of work, and would probably work better in standard sized cupcakes! I heart mini cupcakes so much, and these were so cute on the sticks, but with the filling they sort of start to fall apart once they get a little warm. So if you make minis, keep them in the fridge and once you take them out, eat them quick!

I also drizzled vanilla bean caramel sauce on these for added caramel-ness. The recipe is here, be careful with it. ;o)
So enough of the quiet, I need to catch up. I made these caramel apple cupcakes for my crochet group before the holidays. They were really good, but a lot of work, and would probably work better in standard sized cupcakes! I heart mini cupcakes so much, and these were so cute on the sticks, but with the filling they sort of start to fall apart once they get a little warm. So if you make minis, keep them in the fridge and once you take them out, eat them quick!
I also drizzled vanilla bean caramel sauce on these for added caramel-ness. The recipe is here, be careful with it. ;o)
Saturday, December 3, 2011
Caramel Apple Cookies
Well, these cookies were easy to make and tasty. But I'm not sure they captured the essence of caramel apple. Maybe I needed a better toffee mix in? The recipe called for toffee bits and I used chopped butterscotch morsels...hmm...

Caramel Apple Cookies
Adapted from Bakers Royale
1 3/4 cup unbleached all purpose flour
1/2 teaspoon baking soda
1 3/4 sticks butter
1/2 cup granulated sugar
1/2 cup packed dark brown sugar
1 teaspoon salt
1 teaspoon vanilla extract
1 large egg
1 large egg yolk
1 cup diced apples (4 oz.)
3/4 cup chopped salted roasted almonds
1/2 cup toffee bits (chopped butterscotch chips?)
- Preheat oven to 350 F and line cookie sheets with parchment paper (not essential, but it helps)
- Whisk flour and baking soda together and set aside.
- Heat 10 tablespoons of butter in a skillet over medium heat until melted about 2 minutes. Continue stirring for another 1-3 minutes until brown and there is a nutty aroma. Remove from heat. Pour heated butter through a sieve into a heat proof bowl. Stir in remaining butter until completely melted.
- Add both sugars, salt and vanilla to bowl with butter and whisk until fully combined.
- Add egg and egg yolk, whisk until mixture is smooth and no sugar lumps remains.
- Let mixture stand for 3 minutes then whisk for another 30 seconds.
- Repeat step four 2 more times until mixture is thick and shiny. The butter will start to firm up as it cools and come more to resemble cookie batter
- Stir in flour mixture until combined.
- Stir in apples, roasted almonds and toffee bits combined.
- Use an ice cream scoop to form cookies. Place dough 2 inches apart on cookie sheet.
- Bake cookies one tray at a time, rotating cookie sheet halfway through baking. Bake until cookies are golden brown and still puffy. Approximately 10-14 minutes.
- Cool on cookie sheets set on wire rack before removing to wire rack to cool completely
Tuesday, October 25, 2011
Mini Pumpkin Spice Latte Cupcakes
These are quite possibly one of my favorite cupcakes I've ever made. Ever. You can taste both the pumpkin and the coffee. I love the whipped cream frosting and the vanilla bean caramel is super impressive and delicious. These cupcakes look great and they taste incredible.

Sunday, September 4, 2011
Salted Caramel Brownies (of Doom!)
Hello friends! I feel like I haven't blogged in awhile but I have an excuse! We lost our power due to hurricane Irene last Sunday, and it didn't come back until this past Friday night! But the good news is it's back. Losing power was the worst we had though, others were not so lucky and hopefully will continue to dry out and bounce back slowly but surely!
So now that power and internet are back, I can share my lovely salted caramel brownies with you! I seem to have a lot of advice to dispense for these. I also added my own notes in italics to the recipe instructions where I deviated from the original.

First, they're made with fancy schmancy fleur de sel. Which I purchased from (one of) my favorite store ever, Savory Spice Shop! But really...you can use any sea salt...it is mixed into the caramel, but it's also used as an edible garnish on top which is nice because it won't dissolve into the brownie. So don't go crazy looking for it, my advice is that it's not critical!
Also, if you have never made caramel before, READ THIS!!!! This was my first time making caramel from heating sugar and I totally smoked out my kitchen and burned the first batch to hell. That's why I refer to them as brownies of doom, because it was horrific! Unlike the fler de sel, this advice is critical!
The recipe I followed and others I've looked at advise to heat the sugar to a certain temperature using a candy thermometer. Ignore that! Use your eye to watch the color carefully! When sugar is light khaki TAKE IT OFF THE HEAT! It will continue to cook and darken QUICKLY. Let "settle" before pouring cream in it, because it will bubble up like crazy at that point! Also when pouring the cream, whisk like you've never whisked before. Make sure you set the pot somewhere stable and be EXTREMELY, SUPER careful of drips because you will get scalded badly. If it drips on your counter or stove, let it cool and harden, this dissolve it off. Please follow this advice and stay safe out there!
Salted Caramel Brownies
From Divine Baking
For the filling
1 cup sugar
2 tablespoons light corn syrup
1/4 cup water
1/2 cup heavy cream
1 teaspoon Fleur de Sel (or any coarse sea salt)
1/4 cup sour cream
For the brownies
1 1/4 cups all-purpose flour
1 teaspoon salt
2 tablespoons dark unsweetened cocoa powder
11 ounces quality dark chocolate (60 to 72%), coarsely chopped
1 cup unsalted butter, cut into 1-inch cubes
1 1/2 cups sugar
1/2 cup firmly packed light brown sugar
5 large eggs, at room temperature
2 teaspoons vanilla extract
1 1/2 teaspoons Fluer de Sel
1 teaspoon coarse sanding sugar (optional, for garnish)
Make the caramel of doom


So now that power and internet are back, I can share my lovely salted caramel brownies with you! I seem to have a lot of advice to dispense for these. I also added my own notes in italics to the recipe instructions where I deviated from the original.
First, they're made with fancy schmancy fleur de sel. Which I purchased from (one of) my favorite store ever, Savory Spice Shop! But really...you can use any sea salt...it is mixed into the caramel, but it's also used as an edible garnish on top which is nice because it won't dissolve into the brownie. So don't go crazy looking for it, my advice is that it's not critical!
Also, if you have never made caramel before, READ THIS!!!! This was my first time making caramel from heating sugar and I totally smoked out my kitchen and burned the first batch to hell. That's why I refer to them as brownies of doom, because it was horrific! Unlike the fler de sel, this advice is critical!
The recipe I followed and others I've looked at advise to heat the sugar to a certain temperature using a candy thermometer. Ignore that! Use your eye to watch the color carefully! When sugar is light khaki TAKE IT OFF THE HEAT! It will continue to cook and darken QUICKLY. Let "settle" before pouring cream in it, because it will bubble up like crazy at that point! Also when pouring the cream, whisk like you've never whisked before. Make sure you set the pot somewhere stable and be EXTREMELY, SUPER careful of drips because you will get scalded badly. If it drips on your counter or stove, let it cool and harden, this dissolve it off. Please follow this advice and stay safe out there!
Salted Caramel Brownies
From Divine Baking
For the filling
1 cup sugar
2 tablespoons light corn syrup
1/4 cup water
1/2 cup heavy cream
1 teaspoon Fleur de Sel (or any coarse sea salt)
1/4 cup sour cream
For the brownies
1 1/4 cups all-purpose flour
1 teaspoon salt
2 tablespoons dark unsweetened cocoa powder
11 ounces quality dark chocolate (60 to 72%), coarsely chopped
1 cup unsalted butter, cut into 1-inch cubes
1 1/2 cups sugar
1/2 cup firmly packed light brown sugar
5 large eggs, at room temperature
2 teaspoons vanilla extract
1 1/2 teaspoons Fluer de Sel
1 teaspoon coarse sanding sugar (optional, for garnish)
Make the caramel of doom
- Combine the sugar and corn syrup with 1/4 cup of water in a medium saucepan, stirring carefully so as not to splash the sides of the pan.
- Cook over high heat until the mixture is the color of khaki or light amber.
Lighter than this, but close: - Remove from the heat instantly and let the bubbling settle.
- Slowly add the cream while whisking
- Add the fleur de Sel.
- Whisk in the sour cream and set aside to cool.

- Preheat oven to 350
- Butter or use cooking spray to coat the sides and bottom of a glass or light colored metal 9 x 13 inch pan.
- Line the bottom with a sheet of parchment paper, and butter or use cooking spray to coast the parchment.
- In a medium bowl, whisk together the flour, salt and cocoa powder and set aside
- Place the chocolate and butter in the bowl of the double boiler set over a pan of simmering water, and stir occasionally until the chocolate and butter are completely melted and combined.
(Note: I do own a double boiler, but after melting the butter and chocolate, you will be adding the sugars, eggs, etc. So I set the bowl of my stand mixer over a bowl of water and melt the butter and chocolate directly in there. Set up looks like this. Then transfer the bowl to the mixer, instead of melting them in a separate pot and scraping into another bowl. I feel it saves me time and a dish to clean.) :oD - Turn off the heat, but keep the bowl over the water of the double boiler, and add both sugars. Note: Whatever...at this point I put it on my mixer. Whisk until completely combined and remove the bowl from the pan. The mixture should be at room temperature at this point.
- Add three eggs to the chocolate mixture and whisk until just combined.
- Add the remaining two eggs and whisk until just combined.
- Add the vanilla and stir until just combined, be careful not to over-beat.
- Add the flour mixture to the chocolate mixture. And beat until there is a just a trace amount of the flour mixture visible.
- To assemble the brownie, pour half of the brownie mixture into the pan and smooth the top with a spatula.
- Drizzle about 3/4 cup of the caramel sauce over the brownie layer in a zigzag pattern, taking care to make sure the caramel does not come in contact with the edges of the pan or it will burn. Note: I found it impossible to keep the caramel from touching the edges, I used a glass pan, it didn't burn, it was fine, I don't know if this hold true for a metal pan though.
- Spread the caramel evenly across the brownie layer.
- In heaping spoonfuls, scoop the rest of the brownie batter over the caramel layer. Smooth the brownie batter gently to cover the caramel layer as best you can.
- Bake the brownies for 30 minutes, rotating the pan halfway through the baking time. Brownies are done when a toothpick inserted into the center comes out almost clean.
- Remove the brownies from the oven and sprinkle with an extra 1 1/2 teaspoons Fleur de Sel and 1 teaspoon coarse sugar.
Saturday, February 26, 2011
Cocoa Caramel Swirl Brownies - Recipe
I whipped these up the morning before a Superbowl party. I adapted them from the cocoa brownies recipe in Wild About Brownies which I chose simply because I had cocoa on hand. :o)

They turned out sticky and fudgey, cutting was an adventure, I ended up removing them from the pan a cutting board and bringing the knife straight down to cut them since dragging the knife through just made them crumbley due to the caramel swirls. :o)
Cocoa Caramel Swirl Brownies
Adapted from Wild About Brownies
3/4 cup all-purpose flour
1/4 teaspoon baking powder
1/4 teaspoon salt
1 cup granulated sugar
2 eggs
1/4 cup vegetable oil
1/4 cup caramel liqueur (I used Baileys)
1/3 cup unsweetened cocoa
1 teaspoon vanilla extract
1/4 teaspoon almond extract (optional)
About 2 tablespoons caramel sauce
- Preheat oven to 350. Grease the bottom and sides of an 8 inch square baking pan. Line bottom with parchment paper, letting paper slightly hang over two edges (good for lifting brownies out to cut).
- In a small bowl combine flour, baking powder and salt.
- In another bowl mix together the sugar, eggs, oil and caramel liqueur with an electric mixer.
- Stir in the cocoa and extracts.
- Stir in the flour mixture until just combined.
- Pour the batter into the prepared pan and spread evenly. Distribute the two tablespoons of caramel sauce over top of the brownies and use a knife to draw in all sorts of fun swirls.
- Bake for 30 - 35 minutes or until a cake tester inserted into the brownie portion comes out almost clean.
- Cool in the pan on a wire rack then remove using parchment paper. Easiest to place on a large cutting board and use the knife to cut straight down to cut the brownies into squares.
- Store in an airtight container at room temp.
Monday, February 21, 2011
My first molded chocolates!
For Christmas my mom got me a petit fours pan that came with instructions on how to make chocolate raspberry truffles. I'd been watching chocolate weekend on food network and was inspired to give them a try.
I didn't want to spend money on fancy ingredients, since it was very possible these could fail completely. So I just got some Wilton milk chocolate melts and decided to give it a go.
I used these instructions for the method and used this recipe for the ganache that I modified. I skipped simmering the cream with the vanilla bean and the espresso power and just went ahead and melted the chocolate and cream together, then stirred in a ton of caramel sauce for a chocolate caramel ganache center. :oD

Since I misplaced the instructions that came with the pan I did my best too google how to prepare a metal pan which is where I made my first mistake. I sprayed it with cooking spray which was just silly, don't do that.
So they didn't quite want to unmold (I had to use a fondue fork to coax them out) and once they did they were dull and pitted from the spray...duh. But they all did come out they were tasty! In the end I powdered them with cocoa powder to hide their imperfections. :o)

Takeaways are that while these were good, they were giant chocolates and I will stick to petit fours for this pan...which I'll have to google... Thanks for looking!
I didn't want to spend money on fancy ingredients, since it was very possible these could fail completely. So I just got some Wilton milk chocolate melts and decided to give it a go.
I used these instructions for the method and used this recipe for the ganache that I modified. I skipped simmering the cream with the vanilla bean and the espresso power and just went ahead and melted the chocolate and cream together, then stirred in a ton of caramel sauce for a chocolate caramel ganache center. :oD
Since I misplaced the instructions that came with the pan I did my best too google how to prepare a metal pan which is where I made my first mistake. I sprayed it with cooking spray which was just silly, don't do that.
So they didn't quite want to unmold (I had to use a fondue fork to coax them out) and once they did they were dull and pitted from the spray...duh. But they all did come out they were tasty! In the end I powdered them with cocoa powder to hide their imperfections. :o)
Takeaways are that while these were good, they were giant chocolates and I will stick to petit fours for this pan...which I'll have to google... Thanks for looking!
Friday, December 31, 2010
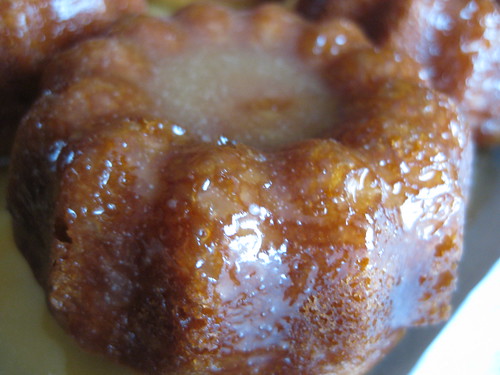
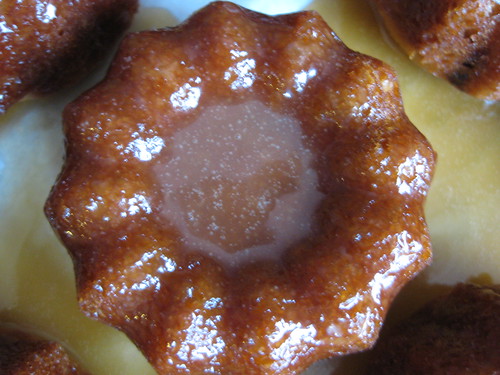
Personal Desserts: Mini Caramel Bundt Cakes
Mini caramel bundt cakes!

Recipe from here, except needs some clarification... I only read where it made 48 cakes! And thought she was crazy, my mini bundt pan makes 6 personalized cakes. So I halved the recipe and filled 5 of them... What? When I looked closer I realized she must have mini mini bundt cake pan! Sort of like mini cupcakes!
While that's adorable, I wish there would have been something in the pictures to clue me in to the scale, I'm guilty of not really reading the post, just the recipe. Ssoooo on the first batch where I only got 5 cakes, I filled the pans too much and baked them a tad too long.
My delicious notes say one full batch made 6 small cakes but if I halved it the first time and got 1 pan worth, the full batch must make 12...I think...

Also should note, the ingredient list for the cakes has caramel liqueur in there, but it's not in the instructions to add. I was making booze free cakes anyway so obviously didn't add it and they came out fine.
I did use this caramel glaze recipe though. And it came out delicious. I made the cakes the night before, and made the glaze in the morning and poured it over the cakes. Then served them in the afternoon. I was torn if I should do the glaze the night before so it could sink in but this came out well. :o)


Recipe from here, except needs some clarification... I only read where it made 48 cakes! And thought she was crazy, my mini bundt pan makes 6 personalized cakes. So I halved the recipe and filled 5 of them... What? When I looked closer I realized she must have mini mini bundt cake pan! Sort of like mini cupcakes!
While that's adorable, I wish there would have been something in the pictures to clue me in to the scale, I'm guilty of not really reading the post, just the recipe. Ssoooo on the first batch where I only got 5 cakes, I filled the pans too much and baked them a tad too long.
My delicious notes say one full batch made 6 small cakes but if I halved it the first time and got 1 pan worth, the full batch must make 12...I think...
Also should note, the ingredient list for the cakes has caramel liqueur in there, but it's not in the instructions to add. I was making booze free cakes anyway so obviously didn't add it and they came out fine.
I did use this caramel glaze recipe though. And it came out delicious. I made the cakes the night before, and made the glaze in the morning and poured it over the cakes. Then served them in the afternoon. I was torn if I should do the glaze the night before so it could sink in but this came out well. :o)
Subscribe to:
Posts (Atom)
