Pages

Monday, June 27, 2011

Birthday Apricot Granola

Dave loves granola made with molasses. So I found this recipe and saved it for him for his birthday.

Birthday granolabaking, granola, apricot

Birthday Apricot Granola
Adapted from Bake it Pretty

4 cups rolled oats
1 cup sliced almonds
1 cup chopped pecans
1 cup hulled sunflower seeds
1/4 teaspoon of salt
1/2 cup vegetable oil
1/2 cup molasses
4 tablespoons brown sugar
1/2 teaspoon nutmeg
2 cups chopped dried apricots
  1. Preheat your oven to 250 degrees and line 2 baking sheets with parchment paper.
  2. Mix oats, nuts, and seeds together in a large bowl or bowl of a stand mixer.
  3. Separately whisk together oil, molasses, salt, brown sugar and nutmeg.
  4. Stir wet and dry ingredients together until well mixed.
  5. Spread the granola evenly between the 2 pans.
  6. Bake for about 50 minutes, stirring granola and rotating the pans at least every 15 minutes.
  7. Remove from oven when it’s evenly golden, and allow the granola to cool completely in the pan.
  8. In a large bowl, mix granola pieces with the chopped, dried apricots. I had to split this into two large bowls to mix in properly!

Apricot granola

Sunday, June 26, 2011

Boston Cream Pie Cupcakes

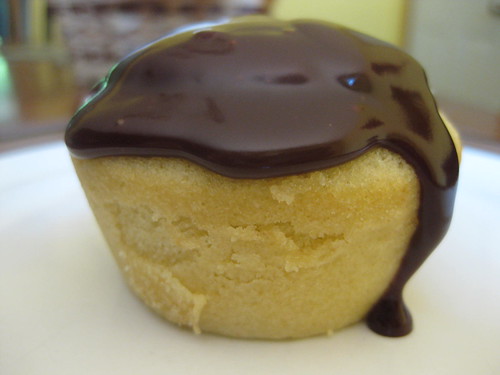
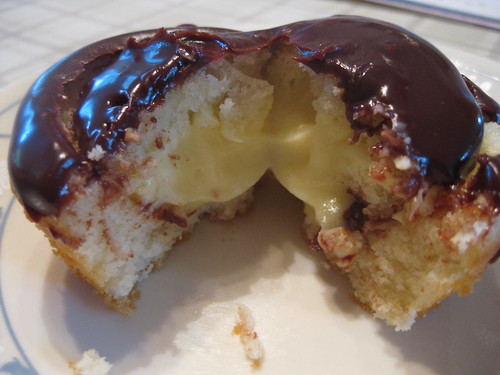
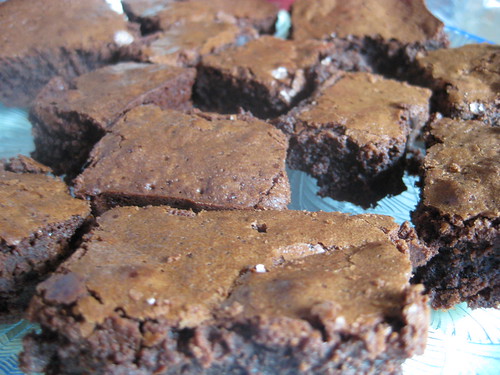
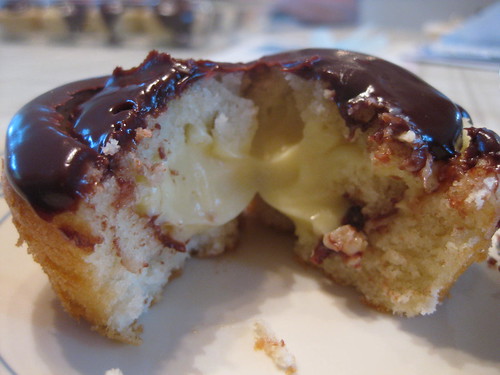
This is my second time making these cupcakes! They're Boston cream cupcakes with pastry filling and amazing chocolate glaze! They were a request from my dad for dessert following Father's day dinner.

Tasty pastry filling

The first time I made these I was very into making all my cupcakes in minis. I still am, but I made a bunch of these as minis, then used the remaining batter in full size cupcakes. The minis were good, but I recommend making them as regular size cupcakes to get as much pastry cream as possible!

Boston Cream Cupcakes
Shame on me, from a magazine I no longer have

Yield about 28 regular sized cupcakes for me

For the pastry cream filling
1 1/3 cup heavy cream
3 large egg yolks
1/3 cup sugar
Pinch salt
4 teaspoons corn starch
2 tablespoons cold unsalted butter, cut into 2 pieces
1 1/2 teaspoon vanilla extract

For the cupcakes
1 3/4 cups unbleached all purpose flour, plus extra for muffin tin
1 1/2 teaspoon baking powder
3/4 teaspoon salt
1 cup sugar
12 tablespoons (1 ½ sticks) unsalted butter, softened but still cool
3 large eggs
3/4 cup milk
1 1/2 teaspoons vanilla extract

For the glaze
3/4 cup heavy cream
1/4 cup light corn syrup
8 ounces bittersweet chocolate, chopped
1/2 teaspoon vanilla extract

Make the pastry cream
  1. 
Bring the cream to a simmer in a medium saucepan over medium heat, stirring occasionally.
  2. Meanwhile, whisk the yolks, sugar, and salt together in a medium bowl.
  3. Add the cornstarch and whisk until mixture is pale yellow and thick, about 15 seconds.
  4. When the cream reaches a full simmer, slowly whisk it into the yolk mixture.
  5. Return the mixture to the saucepan and cook over medium heat, whisking constantly, until thick and glossy, about 1 1/2 minutes.
  6. Remove from heat and whisk in the butter and vanilla.
  7. Transfer the pastry cream to a small bowl and refrigerate, with plastic wrap pressed flush against its surface, until cold and set at least 2 hours or up to 2 days.
Make the cupcakes
  1. 
Preheat the oven to 350 degrees.
  2. Grease and flour a standard cupcake pan (no wrappers lets glaze drip down the sides all pretty-like)
  3. In a large bowl or bowl of a stand mixer, combine the flour baking powder, salt, and sugar.
  4. Add the butter in small pieces one at a time and combine until the mixture resembles coarse sand.
    Note: I used a pastry cutter to do this, mixer wasn't doing it for me.
  5. Add the eggs, one at a time, and mix until combined.
  6. Add the milk and vanilla, increase the speed to medium, and mix until light and fluffy and no lumps remain, about 3 minutes.
  7. Fill the prepared pan about three-quarters full (do not overfill).
  8. Bake approximately 18 - 20 minutes until a toothpick inserted in the center of a cupcake comes out clean.
  9. Cool the cupcakes in a pan for 5 minutes then transfer to a wire rack to cool completely.
Make the chocolate glaze
  1. Cook the cream, corn syrup, chocolate and vanilla in a small saucepan over medium heat, stirring constantly, until smooth.
  2. Set aside to cool and thicken for 30 minutes.
Assemble cupcakes!
Note: My first post of this recipe photo documents this method.
  1. Insert the tip of a small knife at a 45-degree angle about 1/8 inch from the side of each cupcake and cut all the way around, removing a cone of cake.
  2. Cut away all but the top 1/4 inch of the cone, leaving only a small disk of cake.
  3. Fill each cupcake with 2 tablespoons pastry cream and top with the disk of cake.
  4. Set the filled cupcakes on a wire rack set over parchment.
  5. Spoon 2 tablespoons of glaze over each cupcake, allowing it to drip down the sides.
  6. Refrigerate until set, about 10 minutes
These cupcakes can be stored in fridge for up to two days. Bring to room temperature before serving for best pastry cream consistency.

Delicious chocolate glaze

Boston cream pie cupcakes

Thursday, June 23, 2011

Watermelon Sorbet

Well, this tastes refreshing and lovely. Which is some consolation that it takes a great deal of effort to scoop it out of the container. :o/ Yeah...I did it again...

Watermelon Sorbet

I've been struggling with frozen treats freezing too solid. I believe my issue here was that I didn't let the mixture cool to room temp before bothering to process it in my ice cream maker. As a result, it took longer to freeze, and warmed up the bowl so it wasn't going to freeze any more, and was still probably too watery when I transferred it to the container to finish freezing! Wah! I know better!

Had the texture been perfect, the only other change I would make would be to substitute lemon or lime juice instead of the peel. I kept wondering what was rolling around on my tongue as I ate it and it turned out to be the peel. Was I supposed to strain it out? It doesn't really say so, but I would advise to do so, I'm not sure what it does anyway! I suppose it enhances the flavor somehow. I'll have to do more sorbet research to see if it's really necessary!

Watermelon Sorbet
Adapted from Everyday with Rachel Ray

4 cups pureed seedless watermelon
(Rachel says you'll need 5 pounds seedless watermelon that comes up to around 6 cups cut up. I have no idea if that's how much I used! but it's a good guide. Also, I don't believe seedless watermelon actually exists, even if it says so in the stores, don't stress over the seeds)
1/4 cup sugar
Grated peel of 1 lemon
Pinch salt
1/2 cup light corn syrup
  1. Using a blender, puree the watermelon (seeds and all). You will need 4 cups watermelon puree.
  2. Strain the puree to get out as many of the seeds as you can. Don't go crazy.
  3. In a large saucepan, bring 1 cup watermelon puree, the sugar and lemon peel to a simmer over medium-low heat, stirring until the sugar dissolves.
  4. Strain once more to remove the peel.
  5. Season with the salt.
  6. Pour in the remaining 3 cups watermelon puree
  7. Whisk in the corn syrup until incorporated.
  8. Transfer to a metal bowl and put in the fridge until it cools down
  9. Process in an ice cream maker OR if you don't have an ice cream maker, use this method for freezing! (I used this on my most successful sorbet!)

Watermelon sorbet in a wine glass

Watermelon Sorbet

Wednesday, June 15, 2011

"The" Baked Brownie

Apparently this is supposed to be the ultimate brownie. Sounds good. I really decided to make it because I wanted something sweet for a Memorial Day barbecue and this recipe was for a 9 x 13 pan, and I had most of the ingredients on hand! It's pretty simple!

Memorial Day brownies

I followed the recipe from Divine Baking who adapted them from somewhere where it was re-posted, etc. etc. And apparently it won't be a success unless you follow the very specific instructions exactly, cross your "t"s and dot your "i"s. Well, mine were a success, and I admit I skipped some of the details I felt were extraneous.

So I'll be re-posting the recipe below including my own notes in italics.

"The" Baked Brownie

1 1/4 cups flour
1 teaspoon salt
2 tablespoons dark cocoa powder (I had some Mexican cocoa on hand)
11 ounces quality dark chocolate (60-72%), chopped coarsely
8 ounces butter (2 sticks), cut into 1 inch cubes
1 teaspoon instant espresso powder (I used Starbucks Via)
1 1/2 cups sugar
1/2 cup light brown sugar
5 large eggs, room temperature
2 teaspoons vanilla extract
  1. Preheat oven to 350 degrees.
  2. Butter the sides and bottom of a glass or light colored metal pan 9x13x2 pan.
    Or cooking spray works...
  3. In a medium bowl, whisk together the flour, the salt, and cocoa powder.
  4. Configure a large sized double boiler.
  5. Place the chocolate, the butter, and the instant espresso powder in the bowl of the double boiler and stir occasionally until the chocolate and butter are completely melted and combined.
  6. Turn off the heat, but keep the bowl over the water of the double boiler and add both sugars.
    So, my stove is electric, which means when it's shut off the burner doesn't really start to cool down for another few minutes. Plus the sugars would never fit in my double boiler, so I transferred the chocolate mixture to a stand mixer at this point
  7. Whisk the sugars until completely combined. Mixture should be room temperature.
  8. Add three eggs to the chocolate/butter mixture and whisk until just combined.
  9. Add the remaining eggs and whisk until just combined.
    Uh...just add the eggs! Add the vanilla while you're at it
  10. Add the vanilla and stir until combined.
  11. Do not over beat the batter at this stage or your brownies will be cakey.
  12. Sprinkle the flour/cocoa/salt mix over the chocolate.
  13. Using a spatula (DO NOT USE A WHISK) fold the dry into the wet until there is just a trace amount of the flour/cocoa mix visible.
    Eh, I slowly added the dry ingredients with the stand mixer on low and stopped just a touch before it was all mixed in.
  14. Pour the mixture into the pan and smooth the top with your spatula.
  15. Bake the brownies for 30 minutes (rotate the pan half-way through baking) and check to make sure the brownies are completely done by sticking a toothpick into the center of the pan (I would check the brownies about 20 minutes in, because mine were done soon after that).
    Mine were still pretty raw after 30, they took closer to 40.
  16. The brownies are done when the toothpick comes out with a few moist crumbs.
  17. Cool completely in pan on wire rack.
Perfect brownies?
Related Posts with Thumbnails