Pages

Saturday, December 3, 2011

Caramel Apple Cookies

Well, these cookies were easy to make and tasty. But I'm not sure they captured the essence of caramel apple. Maybe I needed a better toffee mix in? The recipe called for toffee bits and I used chopped butterscotch morsels...hmm...

Caramel apple cookie

Caramel Apple Cookies
Adapted from Bakers Royale

1 3/4 cup unbleached all purpose flour
1/2 teaspoon baking soda
1 3/4 sticks butter
1/2 cup granulated sugar
1/2 cup packed dark brown sugar
1 teaspoon salt
1 teaspoon vanilla extract
1 large egg
1 large egg yolk
1 cup diced apples (4 oz.)
3/4 cup chopped salted roasted almonds
1/2 cup toffee bits (chopped butterscotch chips?)
  1. Preheat oven to 350 F and line cookie sheets with parchment paper (not essential, but it helps)
  2. Whisk flour and baking soda together and set aside.
  3. Heat 10 tablespoons of butter in a skillet over medium heat until melted about 2 minutes. Continue stirring for another 1-3 minutes until brown and there is a nutty aroma. Remove from heat. Pour heated butter through a sieve into a heat proof bowl. Stir in remaining butter until completely melted.
  4. Add  both sugars, salt and vanilla to bowl with butter and whisk until fully combined. 
  5. Add egg and egg yolk, whisk until mixture is smooth and no sugar lumps remains.
  6. Let mixture stand for 3 minutes then whisk for another 30 seconds.
  7. Repeat step four 2 more times until mixture is thick and shiny. The butter will start to firm up as it cools and come more to resemble cookie batter
  8. Stir in flour mixture until combined. 
  9. Stir in apples, roasted almonds and toffee bits combined.
  10. Use an ice cream scoop to form cookies. Place dough 2 inches apart on cookie sheet.
  11. Bake cookies one tray at a time, rotating cookie sheet halfway through baking. Bake until cookies are golden brown and still puffy. Approximately 10-14 minutes.
  12. Cool on cookie sheets set on wire rack before removing to wire rack to cool completely
  Caramel apple cookies

Saturday, November 26, 2011

Classic Pumpkin Pie

Figured it was about time I finally wrote my pumpkin pie post. It's from an old cook book I photocopied from my mom and grandmother called Pies Husbands Like Best. Aaaahhahaha! But seriously, it's really simple, classic pie recipes, and they will never fail you!


Pumpkin pie with fall leaf crust

Thursday, November 17, 2011

Apple Almond Streusel Mini Muffins

I made these for a Halloween treat for my office. They disappeared from the kitchen almost immediately. Here we have apple almond streusel mini muffins!

Mini almond apple streusel muffin

The original recipe calls for Amaretto which usually I'm all for, but I didn't have any on hand. Someone must have drank it all...hmm... I've noted the substitution below! Also I suggest increasing the streusel topping, I wish I'd had more, so I've bumped it up in the recipe below. It's hard to have too much crumb topping. :o)

Apple Almond Streusel Mini Muffins
Adapted from ButterYum

For the streusel topping

3 tablespoons all-purpose flour
3 tablespoons brown sugar
1/4 teaspoon plus a pinch extra ground cinnamon
3 tablespoons sliced or finely chopped almonds
3 tablespoons butter, chilled

For the muffins

1 1/2 cups all-purpose flour
1/2 teaspoon baking powder
1/4 teaspoon salt
1/4 teaspoon baking soda
3/4 cup sugar
2 ounces cream cheese
4 tablespoons unsalted butter, softened
1/4 - 1/2 teaspoon almond extract OR 2 tablespoons amaretto (almond liqueur)
1 teaspoon vanilla extract
1 large egg
1/2 cup sour cream
1/4 cup milk
3/4 cup finely chopped apple apples
1 tablespoon all-purpose flour
Make the streusel topping
  1. In a small bowl, combine flour, brown sugar, cinnamon and almonds.
  2. Cut in the butter using a pastry cutter, fork or by hand until the mixture resembles coarse crumbs.
  3. Place in fridge until ready to use.

Make the muffins
  1.  Preheat to 350F and line muffin pan with paper liners. 
  2. In a small bowl, whisk together the flour, baking powder, salt, and baking soda and set aside.
  3. In a second small bowl, combine apples and 1 tablespoon flour and also set aside for later.
  4. In a third small bowl, combine sour cream and milk and set aside for later.
  5. In a large bowl, cream together the cream cheese and butter.
  6. Add the sugar and beat until fluffy. 
  7. Add almond extract (or Amaretto), vanilla extract, and egg and beat until well blended. 
  8. With the mixer on slow, add 1/3 of the flour mixture, then 1/2 of the sour cream mixture, the another 1/3 of the flour flour, then the remaining 1/2 sour cream, and finally the remaining 1/3 flour mixture. 
  9. Stir in apples and spoon into prepared pan.
  10. Go get your streusel topping and sprinkle it generously on top of the unbaked muffins.
  11. Bake for 10 - 12 minutes or until a toothpick inserted in the center comes out clean.
  12. Cool in pan on wire rack for 15 minutes, then remove from pan and cool completely.
Office party mini muffins

Streusel topping

Saturday, November 12, 2011

Easy Pumpkin Danish

I have but one photo to share with you of my pumpkin danish. Because we ate them all right away!

Pumpkin danish

These are made by whipping up the filling, then cutting frozen puff pastry into quarters for each danish. I'm usually such a purist when it comes to baking, but I love puff pastry, and don't mind buying it! My advice on using the puff pastry is to let it thaw out in your fridge if possible, if it gets too warm, it's difficult to unfold! Also if you can, I recommend drizzling with glaze and dusting with powdered sugar right before you serve them, otherwise it melts into the danish!

Saturday, November 5, 2011

Lemon Chiffon Layer Cupcakes

This is a repost of a recipe from my other, short-lived blog. I've decided to focus on masquerading domesticity here, so now it will be a one-stop-shop for all my baking cleverness! So here you go!

These are lemon chiffon cupcakes, with a layer of lemon curd in the middle and topped with vanilla glaze and a homemade candied lemon peel!

Lemon love!

Lemon chiffon layer cupcake

So they weren't perfect! I'd never made chiffon cake before and it wasn't that difficult. But I wasn't really sure what to expect when I baked it into a cupcake. First I knew I wanted to slice them in the middle so I could add the layer of lemon curd, so I baked them without wrappers which is ALWAYS a headache! Never have I ever baked a cupcake or muffin where I didn't murder at least 3 before they came out of the pan when they had no wrappers.

Also I expected they would behave a bit more like an angel food cake which creeps up the side of the pan then keeps going. As you can see here, they didn't do that.

And, my vanilla glaze recipe was wrong wrong wrong, so I ended up adding too much milk. I adjusted the recipe below though so you can make a proper vanilla glaze.

Candying the lemon peel was fun though, if not a little stressful! If you're going to take on all parts of this cupcake, I suggest making the candy lemon peel first, then the lemon curd, then the cupcakes and finally the glaze.


Tuesday, October 25, 2011

Mini Pumpkin Spice Latte Cupcakes

These are quite possibly one of my favorite cupcakes I've ever made. Ever. You can taste both the pumpkin and the coffee. I love the whipped cream frosting and the vanilla bean caramel is super impressive and delicious. These cupcakes look great and they taste incredible.

Mini pumpkin spice latte cupcake 


Sunday, October 23, 2011

Pumpkin Brownie Bites

I tried to make these last year, and even though I messed them up and they burnt to the pan, the salvageable parts were still good! So I thought they deserved a second try.

Pumpkin brownie bites 

This year I made the pumpkin cheesecake batter first, then the brownie batter. Since as the brownie batter cools, it gets thicker and then harder to swirl. It still only turned out okay. Am I the only one with this problem? My espresso cheesecake brownies also advised to make the brownie portion first, how does any swirling get accomplished this way?

Anyway, I also baked them in wrappers, as I had issues with the outsides of them burning last year. Gggrrrrr... Also I had a ton of cheesecake batter left over, both this time and last. I think they looked pretty evenly split, but who knows, I just made a bunch of mini pumpkin cheesecakes, also delicious.

Friday, October 14, 2011

Brown Sugar Maple Glazed Baked Mini Donuts

I love brown sugar. When I can, I've been sneaking it into things to make them extra tasty, like my brown sugar snickerdoodles. I did the same here for these brown sugar, maple glazed baked mini donuts! I brought them to a brunch and they went over very well!

Maple glaze on donut

This made about 30 mini donuts. Also the glaze came out a little thin and I had to re-dip them. Although it's possible they could not have been cooled all the way, so just in case, don't add all the milk to the glaze at once! Add it little by little to make sure you get the right consistency!

Also I always use a piping bag to fill the pan with mini donuts. A spoon just won't cut it, so if you don't have real piping bags do the trick with a zip lock bag instead. I pipe in a somewhat thick "layer" of batter into the bottom of each cavity. If filled too much they won't look like donuts after they rise!


Brown Sugar Maple Glazed Baked Mini Donuts
Adapted from Glorious Treats

For the donuts
1 1/4 cups all purpose flour
1/4 cup granulated sugar
1/4 cup brown sugar
1 1/4 teaspoons baking powder
1/2 teaspoon salt
1/2 cup buttermilk
1 egg
1 1/2 Tablespoons butter, melted
  1. Preheat oven to 425 F.  Spray mini doughnut pan with nonstick cooking spray
  2. In a large mixing bowl, sift together flour, sugar, baking powder and salt.
  3. Add buttermilk, egg, and butter and stir until just combined.
  4. Pipe the batter into your donut pan with a piping bag or zip lock bag with the end snipped off.
  5. Bake 4-6 minutes or until the top of the doughnuts spring back when touched. 
  6. Cool in pan 1-2 minutes, then transfer to a cooling rack. 
For the maple glaze

1 cup powdered sugar
2 Tablespoons milk
1 to 1 1/2 teaspoons pure maple extract
  1. In a small bowl, stir together sugar, milk and extract until sugar is completely dissolved.  
  2. Make sure donuts are completely cooled, then use glaze immediately to dip the donuts.
  3. Place on baking sheet until glaze is set
Maple glazed mini baked donuts

Monday, October 3, 2011

Zucchini Bread - Two for One

I don't think it went over 60 today. Burrr...for awhile fall couldn't seem to make up it's mind if it was staying or going but this past weekend felt like fall! I've started baking my fall themed treats for occasions, but right up until and after Labor Day I still had zucchini! Not from my own garden sadly, but the point is I had zucchini bread so today I have for you, a zucchini bread post!

Summer = zucchini bread 

I don't think I've ever seen a zucchini bread recipe that makes just one loaf, which is just as well because with the way zucchini grows you need to be creative to make sure none goes to waste. So I also have TWO zucchini bread recipes for you! They're both delicious, and they both make two loaves. The zucchini spice bread is a darker loaf with more complex flavors.

See the zucchini?

And the Mom's recipe is mostly cinnamon, and really moist and fully. :oD

Zucchini bread with walnuts

In case you were wondering before you start, don't drain or squeeze the juice out of the zucchini after you shred it. That's how the bread gets all its moisture. And grease and flour your pans really well! I baked mine in disposable tin foil pans. In case you can't free the bread from the pan after baking, it's not a crumbled loss since you can just take the whole pan with you, and not worry about scratching the pan when cutting.

So here it goes, two for one zucchini bread!


Thursday, September 29, 2011

Hummingbird Cupcakes with Honey Cream Cheese Frosting

I made these for an end of summer family bbq! They are denser than most cupcakes (at least mine were anyway). More like a quick bread I think, but delicious none-the-less! As to why they're called hummingbird cupcakes, I really can't tell you! They're made with pineapple, banana, coconut and carrot. Plus I added honey cream cheese frosting. My thinking is the sweet scent plus the colors of the fruit are reminiscent of what attracts hummingbirds? Who knows! It worked for the guests at the party! ;o)

Hummingbird cupcake insides

Hummingbird Cupcakes with Honey Creamcheese Frosting
Adapted from 500 Cupcakes and Sprinkle Bakes

Yield 12 cupcakes 

For the cupcakes
1 1/4 cup all-purpose flour
1 teaspoon baking powder
1/2 teaspoon cinnamon
3/4 cup superfine sugar
1/2 cup safflower oil
2 eggs
1/2 cup (2 medium) mashed bananas
1 1/2 tablespoon grated orange zest
1/2 cup shredded carrot
1/2 cup crushed, drained pineapple
1/2 cup flaked coconut
  1. Preheat oven to 350 and place paper liners in cupcake pan
  2. In a medium bowl, sift together the flour, baking powder and cinnamon and set aside
  3. In a large bowl with electric mixer or stand mixer, cream the sugar and oil together until light and fluffy
  4. Beat in the eggs slowly
  5. Slowly add the dry ingredients and mix until combined
  6. Add the remaining ingredients and mix until combined
  7. Spoon the batter into the prepared baking pan and bake about 25 minutes
  8. Allow to cool in pan on wire rack for 5 minutes before removing cupcakes to wire rack to cool
For the frosting
8 oz. package cream cheese, room temperature
1 stick of butter, softened
1/4 cup clover honey
3-4 cups confectioners' sugar
  1. Place cream cheese, butter and honey in the bowl of a stand mixer and beat until combined
  2. Gradually add in confectioners' sugar, mixing until it is spreading consistency.  
  3. If frosting is too thin, place in refrigerator until firm enough to spread
Unwrapped hummingbird cupcake
Hummingbird cupcake bite

Friday, September 16, 2011

Espresso Cheesecake Brownies

I'm a fan of coffee and chocolate. I usually steer clear of coffee flavored desserts because there will always be people who just don't drink coffee so they refuse to even taste the dessert I worked so hard on. And that makes me sad. It's good, dammit! But on this occasion I knew I was heading to a party of coffee lovers!

Brownie and espresso cheescake layers

I find if I make the brownie portion first, it just gets thicker as it cools and then it's impossible to swirl with the cheesecake portion! So I recommend making the cheesecake portion first and popping it in the fridge while you make the brownies. :oD I made these in an 8 inch round cake pan. The recipe is originally made for a 9 inch square pan but I used most of the batter. And I think the round pan makes a really impressive presentation.

Also, Ghirardelli makes a dark chocolate espresso bar that they sell in supermarkets! If you can find it I highly recommend you use it, but you can use any dark chocolate really.

Espresso Cheesecake Brownies
Adapted from Life in a Peanut Shell

For the cheesecake

1 1/2 teaspoons instant espresso powder dissolved in 1 tablespoon boiling water (I use Starbucks VIA, awesome stuff, and handy when the power was out)
8 ounces cream cheese, at room temperature
2/3 cup sugar
1/2 teaspoon vanilla extract
2 large eggs
1/4 cup sour cream
1 tablespoon all-purpose flour

For the brownies


1/2 cup all purpose flour
1/4 teaspoon baking powder
pinch of salt
5 tablespoons unsalted butter, cut into cubes
4 ounces dark chocolate (around 60% cocoa0) (Note: The Ghirardelli bars I mentioned are 3.5 oz. I bought 2 and broke a little bit off the second bar for the brownies, then saved the rest for garnish...and to eat!)
1/3 cup sugar
2 large eggs
1/2 teaspoon vanilla extract

For the topping

1 1/4 cups sour cream
1/2 cups confectioners' sugar
  1. Preheat the oven to 350 and coat your pan with cooking spay.
Make the cheesecake
  1. Allow the espresso to cool to tepid.
  2. With a stand mixer fitted with the paddle, beat the cream cheese on medium until it's completely smooth.
  3. Add the sugar and continue to beat for 3 minutes more.
  4. Beat in the vanilla and espresso
  5. Add the eggs one at a time
  6. Reduce the speed to low and add the sour cream
  7. Slowly add the flour. Mixture should be very smooth.
  8. cffffffffffffffffffffffffffffffffffffffffffffffff (My rabbit Lillie added step 8 here by stomping on my lap top... I don't know what she's trying to say)
  9. Anyway, place the cheesecake batter in the fridge while you make the brownies
Make the brownies
  1. Whisk together the flour, baking powder and salt.
  2. Melt the butter and chocolate together over a double boiler with water simmering.
  3. Transfer to a stand mixer and add the eggs one at a time, beating after each addition.
  4. Beat in the vanilla.
  5. Gently stir in the dry ingredients just until they are combined, be careful not to over-mix.
Assemble!
  1. Pour about 3/4 of the brownie mixture into the prepared pan.
  2. Smooth it out, then pour the cheesecake layer over the top, taking care to make it even.
  3. Place spoonfuls of the rest of the brownie batter on top, and use a knife to swirl the dark and light batters together.
  4. Bake for around 30 minutes. The brownies should come away from the sides of the pan. The cheesecake will puff and turn lightly browned around the edges.
  5. Transfer the pan to a wire rack to cool.
  6. Once it reaches room temperature, refrigerate for at least 2 hours, until well chilled.
Make the topping

1 1/4 cups sour cream
1/2 cups confectioners' sugar
  1. Warm the sour cream and sugar in a small saucepan over very low heat.
  2. Stir constantly until the sugar is dissolved.
  3. Pour over the chilled brownies, then return them to the refrigerator and chill for at least another hour.
  4. To garnish with chocolate curls, let the chocolate set at room temperature (or under a light to warm up if it's very cold) and use a vegetable peeler to shave the edges off the chocolate
Espresso cheescake brownies

Espresso chocolate "curls"

Sunday, September 11, 2011

Eggless Lemon Ice Cream

Whatever September, tell me when fall really gets here, I'm still making ice cream.

Lemon ice cream

This is eggless lemon ice cream and it's ridiculous easy and quick because you don't have to heat the cream. I found it odd the recipe I followed instructs you to place it in the fridge after the sugar dissolves to let it cool down... My heavy cream just came out of the fridge...in fact that's the only way to keep heavy cream I understand... So maybe I missed something, but even if I did this came out great!

(Eggless) Lemon Ice Cream
Adapted from C&C Cakery

2 cups of whipping/heavy cream
1 cup of sugar
2 lemons worth of zest (about 1/4 cup)
4 lemons worth of juice (about 1/2 cup)
  1. In a metal bowl, combine the cream and sugar.
  2. Using a hand mixer on low, slowly dissolve the sugar (don't actually whip the cream, use a wire whisk if you have to instead)
  3. Add zest and lemon juice while whisking slowly.
  4. Process in an ice cream maker according to manufacturers instructions OR use this method if you don't have an ice cream maker!
Lemon icecream

Eggless lemon ice cream

Sunday, September 4, 2011

Salted Caramel Brownies (of Doom!)

Hello friends! I feel like I haven't blogged in awhile but I have an excuse! We lost our power due to hurricane Irene last Sunday, and it didn't come back until this past Friday night! But the good news is it's back. Losing power was the worst we had though, others were not so lucky and hopefully will continue to dry out and bounce back slowly but surely!

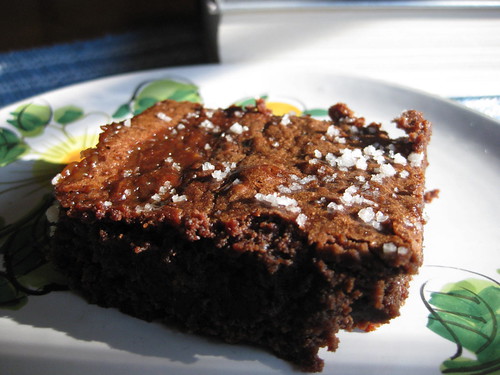
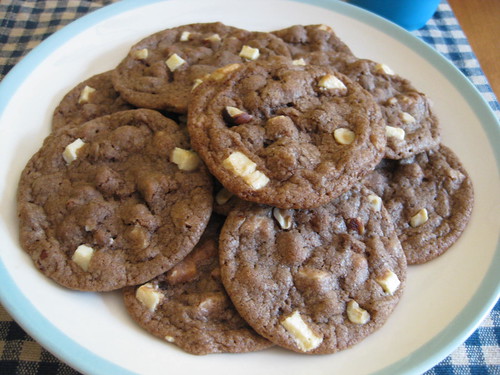
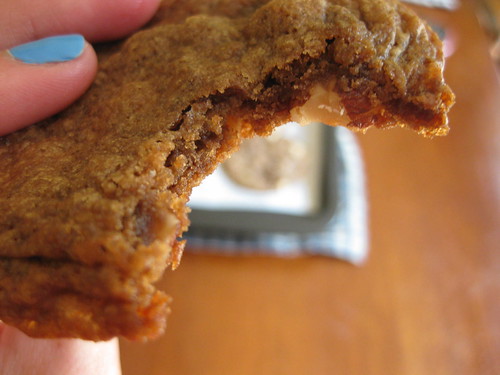
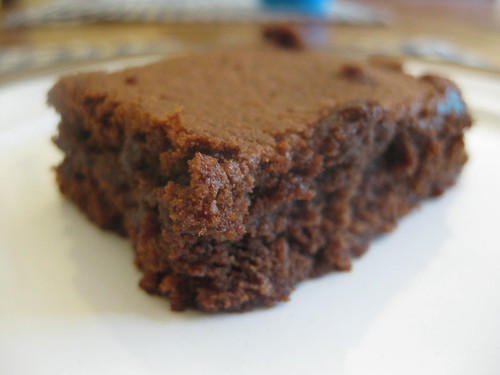
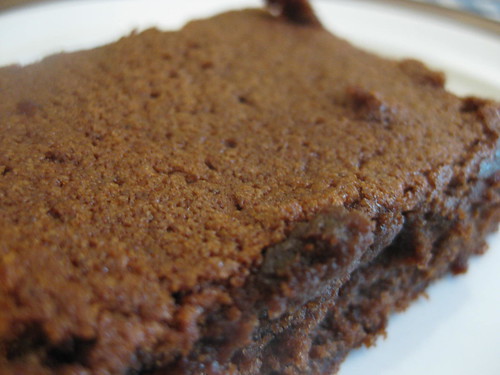
So now that power and internet are back, I can share my lovely salted caramel brownies with you! I seem to have a lot of advice to dispense for these. I also added my own notes in italics to the recipe instructions where I deviated from the original.

Salted caramel brownie

First, they're made with fancy schmancy fleur de sel. Which I purchased from (one of) my favorite store ever, Savory Spice Shop! But really...you can use any sea salt...it is mixed into the caramel, but it's also used as an edible garnish on top which is nice because it won't dissolve into the brownie. So don't go crazy looking for it, my advice is that it's not critical!

Also, if you have never made caramel before, READ THIS!!!! This was my first time making caramel from heating sugar and I totally smoked out my kitchen and burned the first batch to hell. That's why I refer to them as brownies of doom, because it was horrific! Unlike the fler de sel, this advice is critical!

The recipe I followed and others I've looked at advise to heat the sugar to a certain temperature using a candy thermometer. Ignore that! Use your eye to watch the color carefully! When sugar is light khaki TAKE IT OFF THE HEAT! It will continue to cook and darken QUICKLY. Let "settle" before pouring cream in it, because it will bubble up like crazy at that point! Also when pouring the cream, whisk like you've never whisked before. Make sure you set the pot somewhere stable and be EXTREMELY, SUPER careful of drips because you will get scalded badly. If it drips on your counter or stove, let it cool and harden, this dissolve it off. Please follow this advice and stay safe out there!

Salted Caramel Brownies
From Divine Baking

For the filling
1 cup sugar
2 tablespoons light corn syrup
1/4 cup water
1/2 cup heavy cream
1 teaspoon Fleur de Sel (or any coarse sea salt)
1/4 cup sour cream

For the brownies
1 1/4 cups all-purpose flour
1 teaspoon salt
2 tablespoons dark unsweetened cocoa powder
11 ounces quality dark chocolate (60 to 72%), coarsely chopped
1 cup unsalted butter, cut into 1-inch cubes
1 1/2 cups sugar
1/2 cup firmly packed light brown sugar
5 large eggs, at room temperature
2 teaspoons vanilla extract
1 1/2 teaspoons Fluer de Sel
1 teaspoon coarse sanding sugar (optional, for garnish)

Make the caramel of doom
  1. Combine the sugar and corn syrup with 1/4 cup of water in a medium saucepan, stirring carefully so as not to splash the sides of the pan.
  2. Cook over high heat until the mixture is the color of khaki or light amber.
    Lighter than this, but close:
    Caramel of doom
  3. Remove from the heat instantly and let the bubbling settle.
  4. Slowly add the cream while whisking
  5. Add the fleur de Sel.
  6. Whisk in the sour cream and set aside to cool.
Make the brownies
  1. Preheat oven to 350
  2. Butter or use cooking spray to coat the sides and bottom of a glass or light colored metal 9 x 13 inch pan.
  3. Line the bottom with a sheet of parchment paper, and butter or use cooking spray to coast the parchment.
  4. In a medium bowl, whisk together the flour, salt and cocoa powder and set aside
  5. Place the chocolate and butter in the bowl of the double boiler set over a pan of simmering water, and stir occasionally until the chocolate and butter are completely melted and combined.
    (Note: I do own a double boiler, but after melting the butter and chocolate, you will be adding the sugars, eggs, etc. So I set the bowl of my stand mixer over a bowl of water and melt the butter and chocolate directly in there. Set up looks like this. Then transfer the bowl to the mixer, instead of melting them in a separate pot and scraping into another bowl. I feel it saves me time and a dish to clean.) :oD

  6. Turn off the heat, but keep the bowl over the water of the double boiler, and add both sugars. Note: Whatever...at this point I put it on my mixer. Whisk until completely combined and remove the bowl from the pan. The mixture should be at room temperature at this point.
  7. Add three eggs to the chocolate mixture and whisk until just combined.
  8. Add the remaining two eggs and whisk until just combined.
  9. Add the vanilla and stir until just combined, be careful not to over-beat.
  10. Add the flour mixture to the chocolate mixture. And beat until there is a just a trace amount of the flour mixture visible.
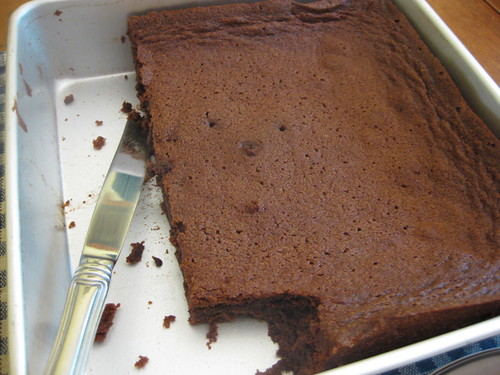
  11. To assemble the brownie, pour half of the brownie mixture into the pan and smooth the top with a spatula.
  12. Drizzle about 3/4 cup of the caramel sauce over the brownie layer in a zigzag pattern, taking care to make sure the caramel does not come in contact with the edges of the pan or it will burn. Note: I found it impossible to keep the caramel from touching the edges, I used a glass pan, it didn't burn, it was fine, I don't know if this hold true for a metal pan though.
  13. Spread the caramel evenly across the brownie layer.
  14. In heaping spoonfuls, scoop the rest of the brownie batter over the caramel layer. Smooth the brownie batter gently to cover the caramel layer as best you can.
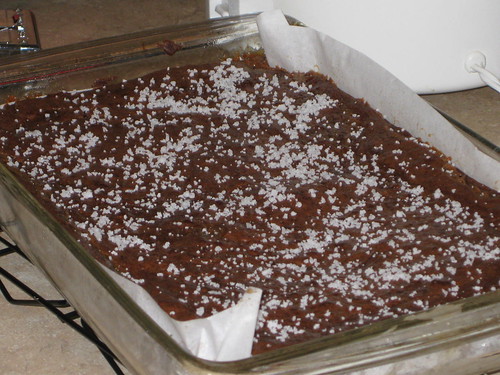
  15. Bake the brownies for 30 minutes, rotating the pan halfway through the baking time. Brownies are done when a toothpick inserted into the center comes out almost clean.
  16. Remove the brownies from the oven and sprinkle with an extra 1 1/2 teaspoons Fleur de Sel and 1 teaspoon coarse sugar.
Fluer de sel = fancy french sea salt...tastes like salt...

Salted caramel brownie

Tuesday, August 23, 2011

White Chocolate Chip Hazelnut Cookies: Made With Nutella!

I felt like making something tried and true recently. But wanted to add a twist to it. Sort of the same way I felt when I made my brown sugar snickerdoodles! I thought a good chocolate chip cookie recipe would be just what I was looking for, since I usually have most of the ingredients on hand and it would be easy to experiment with.

What I dreamed up were white chocolate chip hazelnut cookies with Nutella!

Hazelnuts and white chocolate chips

Well, they came out a little flat for my liking. Although they stayed chewy, as I like them. So if you make them, just make sure to leave plenty of space between each cookie when dropped on your cookie sheet!

White Chocolate Chip Hazelnut Cookies
Adapted from Nestle

1 cup plus 2 tablespoons flour
1/2 teaspoon baking soda
1/2 teaspoon salt
1 stick butter
6 tablespoons sugar
6 tablespoons brown sugar
1/2 teaspoon vanilla extract
1 egg
1 cup white chocolate chips
1 cup chopped hazelnuts
1/3 cup Nutella
  1. Preheat oven to 375 and line cookie sheets with parchment paper
  2. Combine flour, baking soda, and salt in a small bowl and set aside
  3. Beat butter, granulated sugar, brown sugar, Nutella, and vanilla extract until creamy.
  4. Add egg and beat well.
  5. Gradually beat in flour mixture
  6. Reserve a few chips and hazelnuts to place on top of cookies, then stir in remaining chocolate chips and hazelnuts
  7. Drop by rounded tablespoons onto prepared cookie sheets
  8. Place a few chocolate chips and hazelnuts on top of each cookie
  9. Bake 9 - 11 minutes or until lightly browned
  10. Cool on baking sheets for about 2 minutes before removing to wire racks to cool completely

Hazelnut White Chocolate Chip Cookies

Cookie bite

Tuesday, August 16, 2011

Strawberry Lemonade Icebox Pie

This pie looks super impressive and sexy, but it's actually super easy! It is also super sweet, be warned. And, it's a touch hard to cut because of the graham cracker crust, but the slices don't need to be neat to taste good!

This is only the second pie I've made from my Martha Stewart summer of pies magazine article. Making them all may have a been a bit ambitious, but this was a good one!

Strawberry Lemonade Icebox Pie

Strawberry Lemonade Icebox Pie
Adapted from Martha Stewart

For the crust
Vegetable oil cooking spray
9 to 10 graham crackers, broken into pieces
1/4 cup sugar
Salt
5 tablespoons unsalted butter, melted

For the filling
1 can (14 ounces) sweetened condensed milk
2/3 cup strained fresh lemon juice
2 large egg yolks (reserve whites for meringue), plus 1 large egg, lightly beaten
Coarse salt

For the topping
12 ounces strawberries, sliced (2 cups)
1/2 cup sugar
2 teaspoons fresh lemon juice
2 large egg whites, room temperature
  1. Coat a 9-inch pie plate with cooking spray.
  2. Pulse crackers in a food processor until finely ground; measure 1 1/3 cups, and discard excess.
  3. Pulse cracker crumbs, sugar, and 1/4 teaspoon salt in food processor to combine.
  4. Add butter, and pulse until mixture is moist and holds together when pressed between 2 fingers.
  5. Press crust evenly into bottom and up sides of pie plate using the bottom of a dry measuring cup.
  6. Freeze for 30 minutes. Preheat oven to 375 while crust freezes.
  7. Bake crust until firm and turning darker around edges, 10 to 11 minutes.
  8. While crust bakes, start the filling. Whisk together condensed milk, lemon juice, egg yolks and egg, and 1/4 teaspoon salt.
  9. Remove crust from oven, and reduce oven temperature to 325 degrees.
  10. Pour filling into warm piecrust. Bake until center is set, 25 to 30 minutes. (Note: I baked mine longer, probably closer to 35 - 40 min, I think my pie plate was smaller than 9 inches and therefore deeper!)
  11. Transfer to a wire rack, and let cool to room temperature. Refrigerate for at least 3 hours.
  12. To make the topping, slice up the strawberries and sprinkle with 2 tablespoons sugar and the lemon juice.
  13. Give a stir and let stand for 30 minutes.
  14. Meanwhile, heat egg whites and remaining 1/2 cup plus 2 tablespoons sugar in the heatproof bowl of a mixer set over a pan of simmering water until sugar dissolves and mixture is warm to the touch, 2 to 3 minutes. (Note: If you're worried about making meringue from raw egg whites, heat the egg whites to 160 at this point while you dissolve the sugar! I didn't bother checking the temp so I don't know if mind really got to 160, but I've safely made meringues and swiss meringue buttercream frosting using this method before!)
  15. Transfer to mixer, and whisk on high speed until medium peaks form, 8 to 9 minutes.
  16. Position an oven rack in the lowest position and preheat the broiler while your meringue whips.
  17. Spoon strawberries over pie.
  18. Spoon meringue over top of strawberries and place pie under broiler AND DON'T LEAVE IT until meringue is just browned.
  19. Eat the pie!

Glorious strawberry lemonade ice box pie

"Sliced" strawberry lemondae ice box pie

Friday, August 12, 2011

Brown Sugar Snickerdoodles

I have this old cookie recipe book from my grandma. It has a classic recipe for snickerdoodles that make about 4 1/2 dozen cookies and they always come out amazing! They are crisp on the outside and soft and cakey on the inside. They're perfect.

I've actually been seeing a lot of snickerdoodle recipes floating around on blogs so I wanted to do something a little different. I decided to substitute some of the granulated sugar with brown sugar because brown sugar is awesome, meaning brown sugar snickerdoodles would be doubley awesome.

Brown sugar snickerdoodle bite

As I mentioned, this will make about 3 1/2 - 4 1/2 dozen cookies! Some to give away and some to keep for you! I like packing them in cute take out containers to give away. :o)

Brown Sugar Snickerdoodles
Adapted from Sunset Cookies

For the cookies
1 cup butter
1/2 cup granulated sugar
1/2 plus 1/3 cup dark brown sugar (or light brown sugar if you'd rather! Also I think think this is 1 1/6 cup...clearly not my strength...sorry for the crazy measurements!)
2 eggs
3 cups flour
1 teaspoon baking soda
1 teaspoon cream of tartar
1/4 teaspoon salt
1 teaspoon vanilla extract

For rolling
2 teaspoons cinnamon
2 tablespoons granulated sugar
1 tablespoon dark brown sugar (or light brown, again)
  1. Preheat oven to 375 F.
  2. Combine flour, baking soda, cream of tartar and salt in a large bowl and set aside.
  3. In a large mixing bowl, cream the butter
  4. Add the sugars and beat until creamy
  5. Add the eggs and vanilla and beat until combined
  6. Slowly add the flour mixture to the butter mixture and mix until combined
  7. In a separate small bowl, combine the cinnamon, granulated sugar, and brown sugar.
  8. Mix until combined. Use your fingers if you have to to break up the clumps of brown sugar
  9. Roll 1 inch dough balls in the cinnamon and sugar mixture, and place on an ungreased cookie sheet at least 2 inches apart
  10. Bake about 12 minutes or until lightly browned
  11. Let cool on baking sheets slightly before transferring to a wire rack to finish cooling.
Brown sugar snickerdoodles

Brown sugar snickerdoodle cookie plate

Saturday, August 6, 2011

Chocolate Marshmallow Cupcakes

I actually made these for 4th of July. They're marshmallow filled chocolate cupcakes with chocolate buttercream frosting! I colored the marshmallow with red and blue food coloring, and piped it into the center in layers, but in most of them you couldn't tell. Anyway, my point is colored marshmallow filling is fun for holidays!

Fun buttercream frosting

Btw, this is my favorite chocolate cupcake recipe ever, it comes out excellent every time. As for the marshmallow recipe, the marshmallow filling came out well, but I found the directions for the ganache frosting a little...sparse... I didn't understand it had to completely cool or chill before it could be whipped, and I ended up wasting it, it never firmed up. No worries though! I fell back on my favorite chocolate buttercream recipe and piped it on in little dots since I was afraid I would run low. Everyone thought that was super fancy and cute apparently, so I'll definitely do it again!

Marshmallow Chocolate Cupcakes
Makes 24 standard sized cupcakes

For the chocolate cupcakes
Adapted from Ming Makes Cupcakes

1 teaspoon baking soda
1/2 cup buttermilk
6 heaping tablespoons cocoa
2 sticks butter
1 cup water
2 cups sugar
2 cups all-purpose flour
1/2 teaspoon salt
2 eggs
1 teaspoon vanilla
  1. Preheat oven to 350 and place paper cupcake liners in pan.
  2. In a small bowl, dissolve baking soda in room-temperature buttermilk.
  3. In a saucepan, melt butter and cocoa together at a low temperature. Whisking until smooth.
  4. Add water and whisk to combine.
  5. In a separate bowl, whisk together sugar, flour, and salt.
  6. Add cocoa mixture and egg and mix at low speed.
  7. Add buttermilk mixture and vanilla and beat until smooth.
  8. Bake for 20 minutes or until inserted toothpick comes out clean

For the marshmallow filling
From Swanky Pear

1 - 7 oz container marshmallow cream
1/2 cup softened butter
1/3 cup powdered sugar
1 tablespoon water
1/4 teaspoon salt
  1. Combine marshmallow cream and butter. Beat together until smooth
  2. Add water and salt
  3. Slowly add powdered sugar and beat until creamy
Fill cupcakes
When cupcakes have completely cooled, cut out a "cone" from the center of the cupcake. Cut of the bottom of the "cone" and keep the "hat." Spoon a bit of the cookie dough filling into the cupcake and replace the hat. Some nice photos of this method can be found in this post for boston cream cupcakes.

For the frosting
From Cooks.com

6 tablespoons butter
1 cup powdered sugar
4 tablespoons cocoa
2 to 3 tablespoons milk
  1. Cream the butter.
  2. Combine the sugar and cocoa.
  3. Slowly add the sugar and cocoa mixture to the butter and continue beating
  4. Add milk one tablespoon at a time to thin frosting if necessary

Tried to make patriotic marshmallow filling

Saturday, July 30, 2011

Red Wine Sangria Cupcakes

Hello friends, for brief while I thought I would launch a new blog where I would investigate "Can it Cupcake?" An exploration of turning things that are not traditionally in cupcake form, into cupcakes! The idea has legs, but I'm not finding the time to maintain two blogs! So I'm going to merge it back into my baking blog here! Sorry for recycling posts! In the end it will make this blog more exciting with more inspiration!

So in case you missed it on Can it Cupcake, here is the Red Wine Sangria post!

I made these cupcakes in honor of Cinco de Mayo. I've seen a lot of margarita cupcakes or Mexican hot chocolate cupcakes, but I hadn't seen sangria cupcakes! These are chocolate red wine cupcakes with a pineapple ring layer, triple sec orange frosting and topped with lemon lime zest!

Sangria cupcake

Fancy! But for as fancy as these sound I think they could have come out better. I don't recommend halfing the chocolate red wine cupcake recipe, it requires weird measurements to half and they came out kind of dense. The pineapple on the bottom could have also cause that, I was a bit worried it may be too juicy. But the frosting is amazing!

So here is the recipe with full measurements that should yield around 24 regular sized cupcakes!

Red Wine Sangria Cupcakes

For the cupcakes
Adapted from We Are Not Martha

1/2 cup unsweetened cocoa powder
5 oz. chocolate chips
1/2 cup boiling water
2 sticks butter, room temperature
1 1/2 cups sugar
4 large eggs
1 1/4 cups flour
1 1/2 teaspoons baking powder
1 teaspoon salt
3/4 cup red wine (I used a Spanish cabernet sauvignon, for no particular reason other than it was a Spanish red wine and I liked the bottle)
3 cans sliced pineapple rings (my can had 10 rings)
  1. Preheat oven to 350 and line cupcake pans with wrappers
  2. Drain the pineapple slices, and cut as pictured below then place in the bottom of each wrapper
    Pineapple base for Sangria cupcakes
  3. In a heatproof bowl combine cocoa powder and chocolate chips and pour in the boiling water. Quickly mix to combine and until chips are melted
  4. In a stand mixer or large bowl using a hand mixer, cream the butter and sugar together.
  5. Then beat in each egg one at a time until well combined.
  6. In a separate bowl combine the flour, baking powder, and salt.
  7. Slowly add the flour mixture to the butter mixture and mix until combined.
  8. Alternate adding the chocolate mixture and wine until all is well combined.
  9. Spoon the batter into the prepared muffin cups right over the pineapple
  10. Bake for about 20 minutes until a cake tester inserted in the center comes out clean
  11. Cool in pan on wire rack for 5 - 10 minutes then remove to wire rack to cool completly
For the Triple Sec orange liqueur buttercream frosting

1 package powdered sugar (16 ounces)
1/2 cup butter, softened
4 tablespoons Triple sec
2 tablespoons milk
1/2 teaspoon orange extract
  1. Cream the butter in a mixer
  2. Add all other ingredients and start mixing on slow, increasing speed as ingredients begin to blend together
  3. Use more or less milk as necessary to achieve desired consistency
Assembly!
  1. Frost cupcakes once completely cool.
  2. Combine 1 tablespoon lemon zest, and 1 tablespoon lime zest and mix together
  3. Sprinkle zest over frosting and you have sangria cupcakes!


Bi-sected sangria cupcake

Pineapple bottom on sangria cupcake

Lemon lime zest

Monday, July 25, 2011

Mexican Cocoa Brownies

Hello all! I apologize for not having posted in awhile, I was on vacation for a weekend in Cabo San Lucas, Mexico!

And in honor of my Mexico vacation, I give you Mexican cocoa brownies!

Fudgey Mexican cocoa brownie

I didn't get the cocoa in Mexico though. I actually made these before I even left, I wanted to bake something easy and sweet, but special, so I used my Mexican cocoa from Savory Spice Shop! Mexican cocoa and chocolate is special because it's cocoa combined with almonds and cinnamon, very tasty. But if you can't find it in stores, I've found you a substitute! *Measure out the 1/2 cup plus 1 tablespoon unsweetened cocoa powder, and add 3/4 teaspoon ground cinnamon.

The recipe makes two 8 x 8 pans, or one 9 x 13 pan I'm sure, but since it's just Dave and I in the house I halved it and made one 8 x 8, and added some cinnamon extract for fun.

Mexican Cocoa Brownies
adapted from Savory Spice Shop

1/2 cup unsalted butter
1 cup sugar
1/2 cup brown sugar
1 1/2 tablespoon vegetable oil
1/3 cup light corn syrup
3 eggs
1/2 cup plus 1 tablespoon Mexican cocoa (or see substitution above*)
1 cup flour
1/4 teaspoon vanilla extract
1/8 teaspoon cinnamon extract (optional)
  1. Line and butter a 8 x 8 inch square brownie pan and preheat oven to 350 degrees.
  2. In a large mixing bowl, cream the butter
  3. Beast in sugars, oil and syrup until blended.
  4. Stir in eggs one at a time until blended.
  5. Stir in cocoa, flour and extract until blended.
  6. Spread evenly into the prepared pan and bake at 350 degrees for 40 minutes.
  7. Allow to cool in pan before cutting into bars!
Mexican cocoa brownie

Nearly 1/3 didn't even make it to morning

Saturday, July 9, 2011

Ginormous Chocolate Chip Cookie Cake

Delicious, chewy chocolate chip cookie (cake) for 4th of July bbq!

Cookie cake for 4th of July

I used my special cookie cake pan and this recipe from bakerella. I have a giant bag of white and blue M&Ms that I used as well, I had no red...but it didn't affect the taste. ;op

If you don't have a giant cookie cake pan, I'm sure you can use a normal round, or any shape for that matter, metal pan and have a giant cookie that tastes just as good!

Ginormous Chewy Chocolate Chip Cookie Cake
Adapted from bakerella

1 1/2 cups flour
1/2 teaspoon baking soda
1/2 teaspoon salt
1/2 cup butter, softened to room temperature
1/2 cup sugar
1/3 cup packed brown sugar
1 egg
1 teaspoon vanilla
1/2 cup M&Ms, chocolate chips, your choice
  1. Preheat oven to 350 degrees.
  2. Coat pan with non-stick cooking spray.
  3. Whisk flour, baking soda and salt together in a medium bowl and set aside.
  4. Cream the butter and the sugars using a mixer until fluffy.
  5. Add egg and vanilla and mix until combined.
  6. Add the flour and mix until combined.
  7. Stir in your M&Ms
  8. Transfer cookie dough to the pan and spread out evely until the bottom of the pan is covered.
  9. Bake for about 30 minutes (Note: I really think this depends on your pan. The recipe I followed used a very shallow pan and specified 8-10 minutes. Cookie cake instructions specify 30 min and that's what worked for me. Let the depth of your pan be your judge)
  10. Remove and cool.


Awesome cookie cake

Wednesday, July 6, 2011

Blackberry Plum Potpie

I bought a Martha Stewart Living magazine with a piece all about pies. I've decided this will be the summer of the pie, and I shall make them all.

Dave helped choose the first pie, and it turned out to be a good one because you don't even have to make and roll out crust. It's a potpie, which means you put the filling right in the pie dish then cut out puff pastry for the top crust. Blackberry plum potpie, yum!

Freshly baked blackberry plum pie

Blackberry Plum Potpie
From Martha Stewart

For the crust
1 package (14 ounces) thawed frozen puff pastry, chilled (Note: Phyllo dough is NOT puff pastry)
All-purpose flour, for baking sheet
1 large egg white, lightly beaten, for egg wash
Coarse and fine sanding sugar, for sprinkling (optional)

For the filling
1 pound 4 ounces black plums, pitted and cut into 3/4-inch-thick wedges (about 4 cups)
6 ounces blackberries (1 1/4 cups)
1/2 cup granulated sugar
3 tablespoons cornstarch
1/8 teaspoon Chinese five-spice powder
Coarse salt
Freshly ground pepper (optional)
  1. Preheat oven to 375 degrees.
  2. Unfold pastry on a very lightly floured baking sheet, and roll out to a 1/8-inch thickness.
  3. Set a 9-inch pie plate, upside down (do not press down), on 1 side of pastry, and cut around plate using a sharp paring knife.
  4. Remove dish. Cut five 3/4-inch-wide strips from scraps. (I only had enough for 3, clearly I'm not Martha)
  5. Brush round with egg wash (do not let drip down sides)
  6. Adhere strips to surface, and brush again with egg wash.
  7. Cut out a 2 1/2-inch hole in the center of pastry round using a biscuit cutter.
  8. Sprinkle with sanding sugar.
  9. Freeze for 15 minutes.
  10. Mix together plums, blackberries, granulated sugar, cornstarch, five-spice powder, 1/4 teaspoon salt, and 1/8 teaspoon pepper.
  11. Pour filling into pie plate, and cover with parchment-lined foil. (I didn't know what parchment lined foil meant... I layered the parchment paper and foil and covered the dish, parchment side down)
  12. Transfer to a foil-lined rimmed baking sheet.
  13. Bake pastry crust on top rack and filling in bottom third of oven for 30 minutes.
  14. Transfer crust on baking sheet to a wire rack (it should be golden and cooked through). Let cool slightly.
  15. Continue to bake filling until starting to bubble in center, about 30 minutes more.
  16. Remove from oven, uncover, and top with pastry crust.
  17. Bake pie until bubbling vigorously in center, about 10 minutes more. (If the crust looks like it's getting too dark, cover it with tin foil!)
  18. Transfer pie to a wire rack, and let cool for at least 1 hour before serving.

See the blackberries?

First slice of blackberry plum potpie
Related Posts with Thumbnails