Pages

Friday, December 31, 2010

Personal Desserts: Mini Caramel Bundt Cakes

Mini caramel bundt cakes!


Recipe from here, except needs some clarification... I only read where it made 48 cakes! And thought she was crazy, my mini bundt pan makes 6 personalized cakes. So I halved the recipe and filled 5 of them... What? When I looked closer I realized she must have mini mini bundt cake pan! Sort of like mini cupcakes!

While that's adorable, I wish there would have been something in the pictures to clue me in to the scale, I'm guilty of not really reading the post, just the recipe. Ssoooo on the first batch where I only got 5 cakes, I filled the pans too much and baked them a tad too long.

My delicious notes say one full batch made 6 small cakes but if I halved it the first time and got 1 pan worth, the full batch must make 12...I think...


Also should note, the ingredient list for the cakes has caramel liqueur in there, but it's not in the instructions to add. I was making booze free cakes anyway so obviously didn't add it and they came out fine.

I did use this caramel glaze recipe though. And it came out delicious. I made the cakes the night before, and made the glaze in the morning and poured it over the cakes. Then served them in the afternoon. I was torn if I should do the glaze the night before so it could sink in but this came out well. :o)

Monday, December 27, 2010

Cookie post!

I already did one gingerbread cookie post, but this will finish off my cookie post for Christmas baking! It will be a short one since I made Christmas cupcakes this year instead of cookies, plus some other desserts for parties.

So here was my other Christmas cookie!


I got it from a Martha Stewart Christmas cookie magazine I picked up in the super market! Martha knows her stuff. Dave actually picked this one out. I don't have a photo, but the cookie inside is a chocolate mint cookie, like a girlscout thin mint! Delicious!

Something odd happened with the white chocolate though, it melted, then it got really dry and lumpy and I couldn't bring it back to liquid and melty again over the double boiler. I've been meaning to google it and will post if I find an answer! I used Ghirardelli white chocolate chips, plus some bars I had bought for another purpose, but needed after my first bag of chips failed.


So my white chocolate coating came out a little lumpy and not as smooth as Martha's but they tasted good! Only other issue was the crushed candy cane sticks to your teeth when you bite into them, but I didn't hear anyone complaining, haha.

Here's the cookie plate ready for a party!


Next will be my epic dessert post!

Sunday, December 19, 2010

Gingerbreading

It's been a long time since I made gingerbread. I think I was in highschool and my friends and I trashed the kitchen because we thought it would be funny to take pictures covered in flour. I never realized until now that my mom was pretty cool about all that... I don't remember the gingerbread being that tasty though, it was hard and the dough was evil and hard to work with. But this try went much better!


Last week I mixed a bunch of gingerbread, chilled it over night, then rolled it out and baked it up. Then let it cool and decorated it for like 3 hours the next day. I used this recipe, and also used her royal icing recipe. It was my first batch of royal icing ever. Exciting. And while my icing was pretty simple and I think it looked pretty good covered in my Christmas sprinkles! :oD


For the cookies, I baked up some normal sized shapes of gingerbread men, reindeer, trees, etc. And I also had a bunch of mini Christmas cookie cutters that made bite size gingerbread cookies. Mini anythings go over so much better with crowds! Recipe is awesome, I've had them covered in tin foil for a week and they're still nice and soft and chewy. Amazing.


For the royal icing though, I required much more water than the recipe called for to make it anywhere close to a good consistency for piping. In fact I could of used more I think, and I had a ton left over. I read it can be stored at room temp in an air tight container for up to two weeks, which I'm doing and had good intentions for a gingerbread house or something else cool, but we'll see.

Here's one more pic of a mini gingerbread tree with Christmas nonpareils.


And one more of a super cool full size gingerbread man.


More are in my baking adventures set, plus more to be uploaded this week!

Thursday, December 16, 2010

Embroidered Christmas Cards

Normally I don't send Christmas cards, I'm really bad at hanging on to addresses, but that's what facebook is for. So i crafted christmas cards this year, using these instructions to get me started.

I traced cookie cutters for the stencils. I like the snowflakes best but they're also the most work! Each card took about 2 hours or so! These were sent to friends but I still hope to make some for family!

Definitely should of taken these pics during the daylight, but I had to send em! Here's how some of them turned out!


Right now I'm on a mission to finish a crochet gingerbread house in hopes it will be a center piece for a dinner part Sunday. :oX It's ambitious...so here I go!

Tuesday, December 14, 2010

Funfetti!

Tis the season for holiday treats, but it was also my friend Kristine's birthday last weekend!


Perfect occasion for homemade funfetti cupcakes! I used my standard go to for some vanilla buttercream too.

They came out great, only issue was the color on my sprinkles started to run and pretty soon they were mostly tye dye cupcakes. Then, well, when all colors start to mix, you get gray. But they still tasted good!

That is all! Lots more and super cute on the flickr page. Back to Christmas crafting! good night!

Sunday, December 12, 2010

Thanksgiving Baking

I know it's December, and almost Christmas. House is decorated, cards have been sent, gifts are piling up to be wrapped and I've been gingerbreading.

But all that stuff has taken time and I baked some cool stuff for Thanksgiving that deserves a blog post! I short changed a lot of my fall baking treats that were pretty cool so I'm trying not to do that again!

So here's the last of the fall baking, keeping it short and sweet. :o)

1) Pumpkin brownie bites


I baked and pureed my own pumpkins this year (and I still have a freezer full of pumpkin puree). So I meant to bake these to bring to Dave's family that was our second stop on Thanksgiving but my bottom pan burned and I had to pry them out of the pan. :o( The top pan, however, was delicious.

It's a fabulous chocolate brownie "swirled" with a pumpkin cheesecake. My recommendation if you're going to make them is to make the pumpkin portion first then the chocolate portion. My chocolate portion thickened as it cooled and made swirling difficult.

2) Pumpkin cookies withe maple icing


Seeing as I couldn't bring only 8 or so good pumpkin brownie bites for Thanksgiving, I got up early that morning and in addition to baking an apple pie, I baked these pumpkin maple cookies!

I did have maple extract on hand as the recipe calls for and I have to say this icing was orgasmic. If I ever make it again I'll try it with real maple syrup (we bring back a high grade from Maine every year), but the extract gives it some serious flavor. I had a ton left over though and couldn't bring myself to just get rid of it, so I put it in some tupperware and brought it to my mom's to set out at dessert for Thanksgiving. It has the potential to be to all foods what bacon has become to desserts. My uncle tried it on pie and I think my cousin put it over her ice cream.

Anyway, these cookies have a nice pumpkin flavor and also stayed nice and cakey. Love em.

3) Apple Cake


Once back from Maine I had some apples left over from my epic apple pie baking. So I baked up an apple cake from my Totally Tea Time cook book! I really love tea, and going to tea rooms, the whole tea experience. In fact I'd love to own a tea room, I think I'd be great at it, anyway... I got this book as a gift awhile back and thought I'd make some apple scones but this used up far more apples. ;o)

Came out pretty good, I thought I'd frost it with some swiss meringue apple butter frosting I had in the freezer but I don't think that's the point of apple cake and it was good without it anyway. :o)

That's it! That's all my fall baking blogged. On to the next adventure!

The Apple Pie Post

The holidays are busy, cut me some slack... See the flickr page for Christmas photos until the blog catches up with the holiday baking and crafting! There are new photos of my epic gingerbread adventure and crafty holiday cards!

But this post is about apple pie! I made two apple pies this Thanksgiving. One for my fam and one we traveled to Maine with for Thanksgiving with Dave's fam. Here's the one that came to Thanksgiving at my mom's house with us.


I made my first unsupervised apple pie this year (featured in this post of fall baking) and it turned out so well, my mom asked me to handle the apple pie for Thanksgiving. I really was very pleased with it. I got the recipe from a book my mom photo copied for me, Aunt Jenny's Pies Husbands Like.

It's all about how to hook a man with pie, I think it was published in the 50s? So it has to be good. ;o) And the pie did go over well with everyone who tried it! It makes a big deal about the "water whip" method for pie crust that involves pouring boiling water over something called Spry...the same thing as shortening...and then adding the flour etc. I used butter flavored crisco and it did turn out lovely.

I also used my William Sonoma fall pie crust cutters!


Cute! I colored the dough with different color food coloring and cut the leaves out of that. I'm such a nerd. Here's pie 2 that went all the way to Maine. I came home after Thanksgiving and made this that night (hence the bad lighting) since we were leaving the next morning, so glad I had something to bring though, and again everyone seemed to enjoy it. :o)


My crust got a little burnt although I covered it with foil towards the end. I hear there are pie crust protectors that take care of this, but I have yet to see one.

I had some extra pie crust (I had to double Aunt Jenny's recipe for my giant pie dish) so I made some cinnamon and sugar pie crust swirl cookies. My mom and grandma always made these when I was younger with left over pie dough. We snacked on them in the car on the way up to Maine. :o)

Monday, November 29, 2010

Homemade Applebutter

I need to get back to blogging, and I need to get to posting some recipes. Usually, I follow recipes as I find them and add notes to my delicious page. I don't know the rules around posting adapted recipes, but I feel I did enough research to this homemade applebutter recipe to post here!


I wanted to make these apple butter macarons. So first step was I needed apple butter. I had gone apple picking and had some apples to use up. ;o) So Whisk Kid's recipe over here, calls for whole spices like cinnamon sticks, allspice berries...I didn't even know allspice came in a berry... So I did some googling and found substitutes.

Homemade Apple Butter

adapted from Whisk Kid

Yields about 2/3 cup


3 cups diced apples (I think mine were red delicious and rome or courtland?)
2 cups water
½ cups sugar
1 tbsp lemon juice
¼ tsp salt
1 tbsp honey

¾ tsp ground nutmeg

¾ tsp ground cloves

1 ½ tsp ground cinnamon

Peel and dice the apples.

Place the prepared apples and remaining ingredients in a large pot. Bring to a boil (uncovered) over high heat, then reduce the heat and let simmer (also uncovered) until very soft, about 1 ½-2 hours. Be sure to mix every once in awhile, increasing the frequency with which you do so the longer the apples cook. Once very soft and caramelized, remove from heat and allow to cool briefly. Pour into a blender or food processor to puree. Store in the fridge.


It's fabulous, and smells delicious while cooking! My only change after the fact reflected in the recipe above was to omit the black pepper from the allspice substitute. Here is what I found on it:

One teaspoon ground allspice is equivalent to approximate 5 whole berries.
If you need a substitute for allspice combine equal parts of ground cinnamon, cloves, nutmeg, and black pepper.

Right...skip the black pepper, you'll taste it in the applebutter and rather prominently.

And in case you're wondering here's how the macarons turned out!


My macarons have been hit or miss, it seems the baking temps are way to high on all the recipes I've considered and I've consulted quite a few of them... I thought the cinnamon on top would add some significant cinnamon-y flavor, but it did not...and I added 4 tsps of apple butter to the buttercream, but could you taste it in the the end? No. Plus I burned one tray...how does that happen?

Anyway, happy apple buttering!

Saturday, November 20, 2010

Fall baking round up

work has me stressed out, so haven't been keeping up with my little blogger or much baking/crafting for that matter. Flickr has been updated thought!

Here's some cool photos from the season!


Pumpkin muffins!


Apple cider mini donuts! Yes! I got a mini donut pan! <3
My first apple pie all by my big self. With apples we picked from the orchard.


Sexy apple pie slice with homemade ginger ice cream, without and ice cream maker. Still a success! Doesn't go as well with the apple pie as I thought but it's tasty. :oD


Homemade apple butter, would of been great except don't use black pepper in your all spice substitute, worst idea ever.


Vanilla and apple butter swiss meringue buttercream macaron. That's cinnamon on top, did it taste like apple cinnamon? No...just sugar. Still looking for a decent macaron recipe, baking instructions are all wrong for the ones I tried so far!


Ghost shaped Count Chocula cereal treats for a halloween party. They were awesome.

Saturday, October 30, 2010

happy halloweekend!

Omg! A crochet post!


Finally made some critters from my Creepy Cute Crochet book! And here they are for Halloweekend!

Devil (pardon the hot glue button eyes)


I heart my creepy cute button eyes, btw, very Coraline! I think I'll try to make a creepy cute style Coraline.

Reaper (and more Reaper here)


Skeleton bride and groom. She's missing a veil, she's not a "blushing" bride I guess. haha. If I find some tool for an appropriate price that I don't have to buy 50 pieces of, or come across something to substitute, I'll finish her up. Until then...Creepy Cute Skeleton Bride and Groom! I LOVE his top hat, btw.


Vampire Queen! Vampire queen is definitely the coolest creepy cute character I've made. I envy her long red hair. The hair is tricky, but I think this one came out okay for a first try. My first try fell apart, I couldn't even untangle it. But she's definitely awesome.


So what did I think of the patterns in this book? She has a great blog with a lot of tutorials, etc., but I have to say I found a lot of the instructions overly complicated for some things. Like the heads are made in rounds and decreased randomly all over the place, why? It's apparently because the head is shaped slightly oblong...but could you not do that in spirals? And who can tell anyway. Also for things like the hems of the skirts on the bride and vampire queen, it sounds like you're supposed to like double back and crochet in the stitches you just made, but I couldn't figure out how to get there without turning or something, and then I'd be crocheting in the wrong direction...whatever!

My advice to anyone following the patterns in this book is definitely take the time to make all the little details! For example I had no idea vampire queen had a collar, because who can tell from the picture and I was eager to finish her! But make it, it looks cute in real life. :o) But don't loose sleep over following the stitches exactly as they're written if you're having trouble, just make it how it looks good or works for you and move on! And stitch the faces before you fill the head, hello...

And last, my characters needed a vehicle in which to reside, since I just stuffed them with fiberfill and no one really stands up properly without some effort. So I made the great pumpkin bowl!


Loosely based on a pattern I found on Ravelry somewhere, I improvised most of the lid and all of the details like the stem, leaf, and vines. I started a second larger one but he'll become a harvest pumpkin, and not so much a halloween pumpkin. :o)


Please visit my flickr page for more halloween crochetedness!

Happy halloween kids!

Friday, October 22, 2010

my first french macarons: pumpkin with cinnamon buttercream filling

I love mini desserts. I haven't known about french macarons for long but they're so damn cute I had to learn how to make them. in googling some recipes I saw another blogger mention this book, I Love Macarons by Hisako Ogita which is apparently the macaron bible. Although I have a wishpot which is mostly books, I've sort of sworn off buying baking books or magazines, since there's ssssooooooooo many recipes online. But since my new obsession I decided to stop by Barnes and Noble to see if they had any macaron-ing books, and it was there!

I actually brought it home and read it. Like from cover to cover. I read a review on it later which said something about it originally being published in Japanese? Then translated...this was clearly translated. :o)

Anyway, on to the macarons!


I am pretty impressed they worked the first time around! It was not without incident though. In the book, she describes this method for making butter cream where you make syrup (I guess) by microwaving the hell out of sugar and water for 4 minutes!? This is crazy, I actually did it and burned the hell out of the sugar, surprise, and thought my measuring cup was not going to be salvaged. It was, but that's just a bad idea.

I stuck a bunch of sticky notes all over the pages as well, here are what some of them said, in case you're a first time macaron maker as well:
  1. Seriously...just sift it (she says sift the almond meal and powdered sugar twice, i half assedly did it once...but it makes it much lighter and fluffier...so just sift it, once should do it...)
  2. Cut the damn parchment so it's flat, otherwise macarons may run when piped
  3. Don't pipe onto the same side as the circles are drawn on, it comes off on the macron, oops. Either flip parchment over or make a template on a new piece of paper that you remove after piping.
  4. When getting ready to stir 15 or 20 (or whatever gets the job done, hello) times, add the food coloring at this point
  5. When piping, don't swirl. pipe straight down until it spreads out and fills the circle
  6. Really, make sure the oven racks are in the center, my bottom rack burned. And check em! Mine baked way faster than 15 minutes
Those are my macaron gems of wisdom for you.


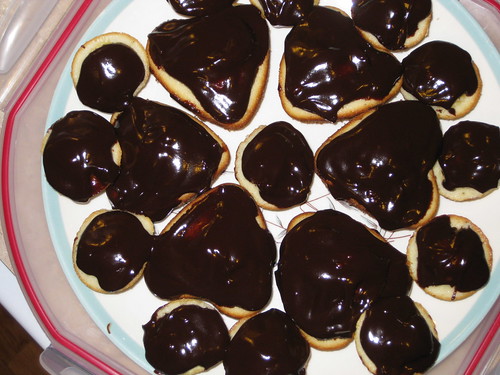
But beware when good macarons go bad. Here's what happened to mine that were on the bottom rack and piped by swirling, it's hard to look at...


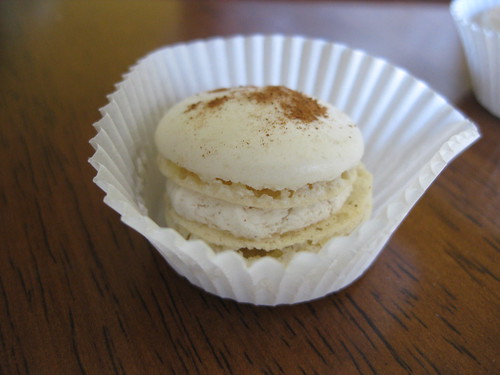
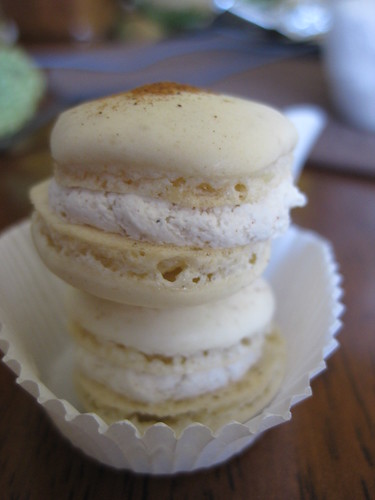
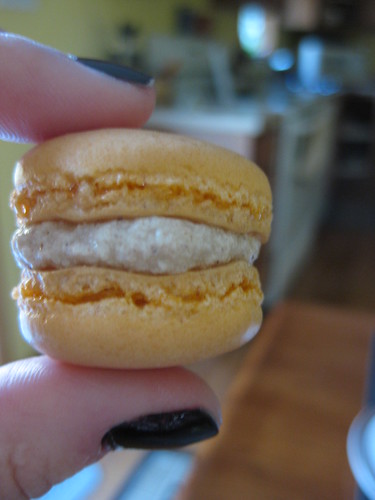
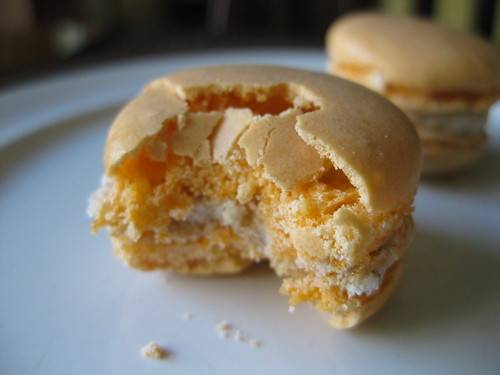
Yikes! Sad... this one is better. :o) They even baked up with the little "foot," without which they can't be called macarons apparently. They're (by "they" I guess I mean the French?) referring to the little crinkley baked up looking part at the bottom of the macaron.


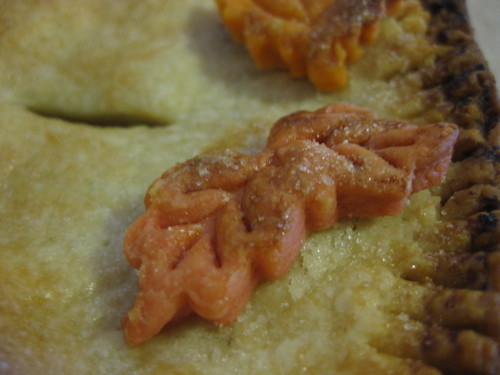
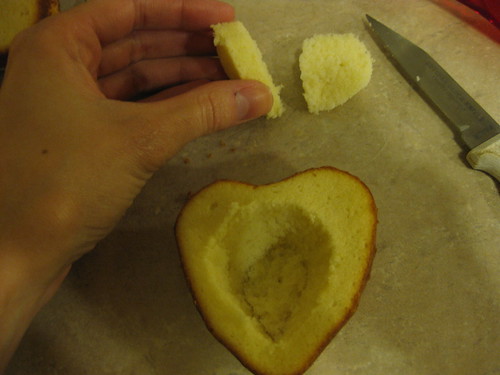
Oh, by the way, to get the pumpkin flavor I used two teaspoons of pureed pumpkin added to the meringue. I have many many bags of pumpkin puree, as it is also the first year I've pureed my own pumpkins and Dave bought me 3. :o) We'll be having pumpkin treats until into the new year I think. :o)

Also here is the recipe I used for the cinnamon buttercream. Good, but super sweet, maybe too sweet? I made a note to try with less sugar next time. Dave confirmed the macrons over all had a nice pumpkin pie taste, so for my first time these were certainly a success. I've decided this winter will be the year of the macaron, so I have more macaron plans to come.

One more sexy macaron picture and the rest are on flickr.

Wednesday, October 20, 2010

heart shaped 40th anniversary boston cream cupcakes

My parents were married 40 years in September! Dave and I joined them for dinner Sunday night and I made Boston cream cupcakes from a magazine my mom bought. My dad had book marked the recipe for me since he knows about me and cupcakes :o)


The cupcakes are filled by cutting out the center and slicing away the "cupcake innards," then filling with pastry cream the putting the cupcake top back on. I was pretty sure it would work best with full sized cupcakes so I broke out my heart shaped pan and did the rest in minis. Since I do love minis so.

My only real issue was they're baked without wrappers so the glaze can run amok down the sides, but the edges got a little dark on some of the minis. :o/ Not sure if it was the pans, position of the oven rack or what, because it varied by pan, but most came out good enough!

I thought I'd try piping the filling in on the minis, but no luck, since the cake is denser to support the filling, I ended up "coring" and filling them by hand too. I think it was 1:00 am by the time I finished. Plus I got excited to fill the cupcakes since this was my first filled cupcake, and I filled them all before making the glaze, then realized the glaze is supposed to sit. wah.

Here's my play by play for filling:

1) Slice out cupcake center


2) Slice away middle and save to layer with pastry cream and chocolate glaze for parfait later! :oD


3) Fill!


4) Reassemble the cuppity cake


Fabulous! Here's how they look cut into.


They're best at room temperature so the filling becomes pudding like, but we kept them in the fridge, and it was really hard waiting until they came back to room temp before consuming. The minis especially, you can eat them in one bite. Totally make the effort to fill them with as much pastry cream as possible, that stuff is orgasmic and it's what makes these cupcakes extra amazing.

More in the flickr page, as usual, plus a bunch of fall baking I have yet to post!
Related Posts with Thumbnails